
Vapor chamber cooling systems have revolutionized modern high-performance laptops. Unlike traditional copper heat pipes, a vapor chamber uses a flattened, vacuum-sealed copper chamber containing deionized water. This liquid boils under processor heat, turns to vapor, dissipates thermal energy across ultra-thin copper heatsink fins, and condenses back to liquid. However, this high-efficiency engineering relies heavily on high-RPM blower fans pulling clean air through microscopic gaps between fins that measure just 0.1mm to 0.2mm thick.
When dust accumulates, it creates a thick, felt-like blanket directly between the fan housing and the vapor chamber radiator walls. Attempting to clean a vapor chamber setup incorrectly can lead to catastrophic hardware failure. Puncturing the thin copper wall destroys the internal vacuum, rendering the $150 to $300 cooling assembly useless. Pushing compressed air through fan blades without holding them still can generate reverse voltage (back-EMF) that short-circuits motherboard MOSFETs or ruins fluid dynamic fan bearings. Following a methodical, low-impact cleaning protocol restores factory air circulation without risking critical hardware in 2026.
As an Amazon Associate we earn from qualifying purchases at no extra cost to you.
What You Need
| Item | Why | Optional? |
|---|---|---|
| Precision Driver Set (PH00, TR6, P5) | Removes small chassis screws (3mm to 7mm lengths) without stripping threads. | No |
| Canned Air or Antistatic Electric Duster (30–45 PSI) | Dislodges compressed dust buildup from cooling fins and fan cavities. | No |
| Plastic Spudger / Guitar Pick | Safely prying bottom chassis clips and disconnecting internal cables without spark risks. | No |
| Soft Antistatic Detail Brush | Sweeps away clinging dust mats from delicate fan blades and intake grilles. | No |
| 99% Isopropyl Alcohol & Cotton Swabs | Cleans stubborn grime on fan frame edges and frame surfaces without leaving moisture. | Yes |
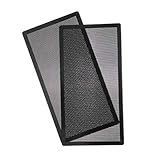
| 287mm Magnetic Dust Filter or PVC Mesh Cover | Mounting custom intake filtration (typically $8–$12 per 2-pack) reduces internal cleaning needs. | Yes |
| Anti-Static Wrist Strap | Grounds your body to prevent electrostatic discharge (ESD) from damaging surface components. | Yes |
Step-by-Step
1. Workspace Preparation and Laptop Power-Down (Estimated Time: 5 Minutes)
Shut down the laptop completely through the operating system rather than putting it into sleep or hibernate mode. Unplug the AC power adapter (which typically supplies 180W to 330W of current) and disconnect all USB accessories, display cables, and external drives. Clear a clean, well-lit table and lay down an antistatic mat or a non-abrasive microfiber towel. Attach an anti-static wrist strap to a grounded metal object to prevent static transfer to sensitive integrated circuits.
2. Bottom Chassis Removal and Battery Isolation (Estimated Time: 10 Minutes)
Use the appropriate precision bit to unscrew the bottom panel fasteners. Keep track of screw placement, as manufacturers often use varying thread lengths ranging from 3mm to 7mm. Use a plastic spudger to gently pop the perimeter retention clips along the seam. Lift off the lower cover to expose the mainboard. Before touching any cooling components, locate the internal battery connector plugged into the motherboard (connected to the 60Wh to 99.9Wh battery unit). Gently slide or lift the connector straight out using your plastic spudger to eliminate any electrical potential across the circuit board.
3. Assessing the Vapor Chamber and Fan Alignment (Estimated Time: 5 Minutes)
Identify the large, flat copper or nickel-plated vapor chamber module spanning across the CPU and GPU dies, leading toward the rear and side exhaust radiators. Note that you do not need to unscrew or unseat the vapor chamber itself; lifting the chamber breaks the factory thermal paste or phase-change material seal. Inspect the dual blower fans attached adjacent to the chamber’s fin stacks to see where dust has concentrated.
4. Securing and Cleaning the Fan Blades (Estimated Time: 10 Minutes)
Never spray compressed air into a laptop fan without physically immobilizing the fan blades. High-velocity air can force fan bearings past their rated 6,000–10,000 RPM limit or act as a generator, sending destructive electrical feedback directly into the motherboard header. Lightly place a finger or a non-conductive wooden toothpick in the center fan hub to hold the impeller still. Hold the canned air canister upright (to prevent cold liquid propellant from spraying out) about 4 to 6 inches away. Deliver short, controlled 1-second bursts of air directly into the impeller blades to blast out trapped lint.
5. Back-Blowing the Vapor Chamber Radiator Fins (Estimated Time: 10 Minutes)
Dust naturally gathers on the intake side of the ultra-thin vapor chamber radiator fins, creating a thick felt pad between the fan housing and the fins. Direct your compressed air or electric duster nozzle from the outside exhaust vents backward into the fan cavity. This “back-blowing” technique dislodges the compact dust pad and forces it out into the open fan area rather than wedge-packing it deeper into the 0.1mm fin channels. Use your soft antistatic detail brush to gently sweep away loose debris and clear the fan housing walls.
6. Reassembly, Battery Reconnection, and Verification (Estimated Time: 10 Minutes)
Inspect the interior under a bright light to ensure no loose dust balls remain inside the chassis. Reconnect the main battery cable securely to its terminal block. Align the bottom panel, snap the perimeter clips into place, and hand-tighten the chassis screws in a cross-pattern to reasonable finger tightness (around 0.2–0.3 Nm of torque) to prevent stripping plastic screw posts. Power on the laptop, open system diagnostic software, and check that fan speeds ramp up correctly. Confirm that CPU and GPU idle temperatures rest steadily between 35°C and 45°C.
Mistakes to Avoid
- Free-spinning fan impellers: Blasting air without holding the fan hub can ruin bearings and send high voltage back into motherboard control ICs.
- Using metal probes near copper fins: Metallic tools can crush fragile 0.1mm heat-exchanger fins or puncture the 0.3mm copper outer shell of the vapor chamber. Losing the chamber’s internal vacuum permanently ruins its heat transfer ability.
- Inverting compressed air cans: Tilting or shaking canned air sprays freezing liquid fluorocarbon propellant, which can thermal-shock delicate silicon chips or leave conductive moisture residues behind.
- Using low-grade rubbing alcohol: Applying 70% isopropyl alcohol introduces 30% water content to electronic components, which causes corrosion and electrical shorts. Stick exclusively to 99% purity.
- Unscrewing the vapor chamber needlessly: Removing the entire vapor chamber to clean fans requires complete thermal pad and paste re-application. Clean the fans in-place unless thermal paste replacement is necessary.
How Often
Routine fan and heatsink maintenance schedules depend on room conditions, pet presence, and usage intensity:
- Clean environments (hardwood floors, low dust, no pets): Perform an internal cleaning every 8 to 12 months.
- High-dust environments (carpeted rooms, multiple pets, ground-floor desks): Clean fans and fin stacks every 3 to 4 months to prevent airflow strangulation.
To reduce internal dust buildup significantly, consider placing protective mesh covers over the bottom intake grilles. Using a cut-to-fit PVC cover, such as a 287mm Magnetic Fan Dust Mesh Filter (available for roughly $8 to $12 for a 2-pack), catches pet hair and ambient carpet dander before it enters the high-RPM fan housing. External filters can double the time required between full internal disassemblies.
When to Call a Pro or Replace
While clearing dust requires simple hand tools, certain thermal symptoms require professional service or component replacement:
- Loss of vapor chamber vacuum: If the laptop immediately reaches 95°C–100°C under minor load despite high fan speeds and clean fins, the vapor chamber liquid may have lost its vacuum seal through micro-fractures. The entire cooling module must be replaced ($150–$300 for parts).
- Mechanical fan noise: Squealing, grinding, or loud rattling sounds point to worn-out sleeve bearings or a bent fan spindle. Individual fan replacement modules typically cost $15 to $35.
- Damaged motherboard connectors: If battery latches or fan pin headers crack during disassembly, seek an experienced micro-soldering technician rather than forcing connections.
FAQ
Can I clean vapor chamber fans using compressed air from the outside without opening the case?
Blowing air solely through the exterior exhaust vents without opening the laptop pushes the dust pad backward into the fan cavity. While this temporarily breaks the dust wall, the debris remains inside the housing and immediately gets sucked back into the radiator fins as soon as the fans turn back on. Removing the bottom panel is essential for removing dust from the system.
Do I need to re-apply thermal paste when cleaning the fan dust?
No. As long as you leave the vapor chamber retention screws intact and do not break the seal between the copper cold-plate and the CPU/GPU dies, thermal paste stays intact. Only repaste if you unbolt and lift the vapor chamber assembly off the motherboard.
Why is my laptop still running hot after I removed all the fan dust?
If temperatures remain abnormally high after thorough dust removal, three common causes exist: the thermal paste or phase-change pads under the vapor chamber have degraded and dried out, background software is maxing out hardware threads, or the vapor chamber lost its internal vacuum pressure, preventing liquid condensation cycles.
Is an cordless electric duster better than canned air for laptop fans?
Yes. ESD-safe electric air dusters deliver continuous air velocity (typically 30 to 45 PSI) without the risk of spraying cold liquid propellant onto electronic components. While electric blowers cost more initially ($40–$70), they prevent thermal shock risks and pay for themselves over repeated maintenance cycles.
Related guides
- Alienware 16 Aurora RTX 5070 Review: Display, Portability and Configuration Gaps
- Lenovo Legion Pro 7i Gen 10 Review: 64GB RAM and Dual-SSD Configuration
- MSI Katana 15.6-inch RTX 5050 Review: Configuration Strengths and Upgrade Unknowns
- ASUS ROG Strix SCAR 16 G635LX-XS97 Review: Display Ambition, Upgrade Questions


