
Gaming laptops are marvels of modern engineering, packing desktop-class graphics cards and multi-core processors into frames that often measure under an inch thick and weigh between 4 and 6 pounds. However, cramming 100 to 150 watts of thermal design power (TDP) into a tight chassis creates an immense amount of heat. If your laptop’s cooling system is not managed correctly, things can go downhill fast.
When you rely solely on default Windows power plans, your laptop will often prioritize silence over performance, letting internal components bake at temperatures exceeding 90°C (194°F) before the fans kick in. This triggers thermal throttling, which violently drops your frame rates to protect the hardware. Conversely, poorly configured manual controls can lock your fans at 100% speed constantly. This not only creates a deafening 50-plus decibel drone in your home office or gaming room, but it also wears out delicate fan bearings prematurely and turns your laptop into a high-powered vacuum cleaner, sucking up dust, pet dander, and carpet fibers directly into your heatsinks.
As an Amazon Associate we earn from qualifying purchases at no extra cost to you.
Learning how to set fan speed manually on gaming laptop setups in 2026 is the ultimate way to balance peak frame rates, component longevity, and acoustic comfort. By taking control of your fan curves, you can keep your system running cool without subjecting your ears to a miniature jet engine.
What You Need
Before diving into the software settings, make sure you have the right tools on hand to manage your laptop’s thermal profile safely and effectively.
| Item | Why | Optional? |
|---|---|---|
| OEM Control Software (e.g., ASUS Armoury Crate, MSI Center, Alienware Command Center) | The safest, manufacturer-approved method to interface directly with your laptop’s proprietary fan controllers and motherboard sensors. | No |
| Third-Party Fan Utility (e.g., Fan Control, SpeedFan) | Provides granular, node-by-node control if your manufacturer’s native software is too restrictive or bloated. | Yes |
| Compressed Air Can | Clears out physical blockages from the exhaust fins so your manual fan curves can actually do their job. | Yes (Recommended) |
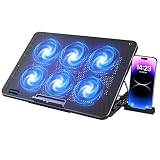
| External Multi-Fan Cooling Pad (Price range: $18 – $25) | Elevates the laptop to maximize intake clearance while auxiliary fans push cool air directly into the bottom vents. | Yes |
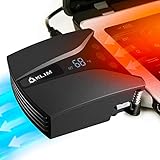
| Vacuum Extraction Fan (Price range: $22 – $30) | Attaches directly to side or rear exhaust vents to forcibly pull hot air out, working in tandem with your manual internal fan speeds. | Yes |
Step-by-Step
Follow these steps to safely access, configure, and test manual fan profiles on your gaming machine. This process takes about 30 to 40 minutes to complete properly.
Step 1: Clean Your Physical Vents (Time: 5 minutes)
There is no point in setting your internal fans to spin at 5,000 RPM if the exhaust vents are choked with dust. Power down your laptop completely and unplug the power brick. Hold a can of compressed air upright and use short, controlled bursts to blow dust out of the intake vents (usually on the bottom) and the exhaust grilles (on the back and sides). Hold the internal fan blades in place with a thin plastic toothpick through the grille if possible, as allowing them to spin freely from compressed air can generate back-voltage and damage the motherboard.
Step 2: Launch Your Manufacturer’s Control Hub (Time: 5 minutes)
Most modern gaming laptops come pre-installed with dedicated management software. Press your laptop’s dedicated hotkey (such as the ROG key on ASUS, or the PredatorSense key on Acer) or search your Windows Start menu for your specific OEM software (e.g., Lenovo Vantage, HP Omen Gaming Hub, or MSI Center). Ensure the software is fully updated to avoid bugs that can lock out manual controls.
Step 3: Locate the Manual Thermal Interface (Time: 3 minutes)
Within your control software, look for a tab labeled “Performance,” “Thermals,” “Hyperfan,” or “Manual.” Most systems default to preset profiles like “Silent,” “Balanced/Performance,” and “Turbo.” Look for a “+” icon or a “Manual/Custom” toggle. You will likely be greeted with a warning screen advising you that manual adjustments can increase system temperatures if set incorrectly. Accept the prompt to unlock the custom fan curve grids.
Step 4: Map Your Custom Fan Curves (Time: 10 minutes)
You will typically see two separate graphs: one for the CPU fan and one for the GPU fan. The horizontal X-axis represents temperature in degrees Celsius (°C), and the vertical Y-axis represents fan speed as a percentage (%). To set an optimized, balanced manual curve, map your nodes to the following baseline values:
- Under 50°C (Idle/Web Browsing): Set fan speed to 20% to 30%. This keeps the laptop virtually silent while performing basic home office tasks.
- 55°C to 65°C (Light Gaming/Productivity): Set fan speed to 45% to 55%. This provides a gentle ramp-up to prevent sudden, annoying noise spikes.
- 70°C to 80°C (Heavy Gaming/Rendering): Set fan speed to 75% to 85%. This is the sweet spot where the fans run fast enough to dissipate high heat loads without hitting maximum acoustic levels.
- 85°C and Above (Extreme Thermal Limits): Set fan speed to 100%. If your silicon chips are reaching these temperatures, you need maximum airflow immediately to prevent damage and thermal throttling.
Step 5: Apply and Stress Test Your Settings (Time: 15 minutes)
Save your custom profile and name it something recognizable, like “Manual Gaming Performance.” Fire up a hardware monitoring tool (such as HWMonitor or HWiNFO) alongside a demanding game. Play for 10 to 15 minutes while keeping an eye on your temperatures. If your CPU stays under 88°C and your GPU remains under 80°C without the fans screaming at a constant 100%, your manual configuration is a success.
Step 6: Integrate External Cooling Solutions (Time: 2 minutes)
If your manual fan curves are still struggling to keep temperatures down under heavy loads, supplement your setup with external hardware. Placing your machine on an ergonomic cooling pad—such as a unit with six quiet 60mm fans drawing 5V USB power—can drop your case and internal component temperatures by an additional 3 to 5 degrees Celsius. Alternatively, a vacuum-style cooler attached to the main exhaust vent can actively siphon out trapped hot air, relieving pressure on your internal fans.
Mistakes to Avoid
- Locking Fans to a Flat, Low Percentage: Never set a flat manual speed (e.g., locking your fans at 40% permanently). While this keeps the laptop quiet, your system will rapidly overheat and potentially shut down mid-game once a heavy load is applied.
- Adjusting Only One Fan: Most gaming laptops utilize dual-fan designs with separate cooling loops for the CPU and GPU. If you only configure the CPU curve and leave the GPU fan on default, your graphics card may choke under load while your processor stays cool.
- Neglecting Ambient Room Temperature: Your manual fan curve is highly dependent on the air entering the chassis. If your home office is 80°F (26.6°C) in the summer, you will need to ramp your manual curves up about 10% earlier than you would in a cool 65°F (18.3°C) room.
- Placing the Laptop on Soft Surfaces: Do not use your newly configured manual curves while gaming with the laptop sitting on a bed, couch, or thick blanket. These soft materials block the intake vents entirely, rendering your manual fan speeds useless and risking hardware damage.
How Often
You do not need to adjust your manual fan curves daily. However, you should re-evaluate your thermal profiles seasonally—specifically during the transition into hot summer months and cold winter months. Additionally, plan to clean your laptop’s internal fans and heatsinks with compressed air every 3 to 6 months. Over time, dust accumulation reduces cooling efficiency, meaning your custom fan curve will have to spin faster (and louder) to achieve the same thermal results.
When to Call a Pro or Replace
While software adjustments can solve most thermal issues, physical hardware eventually degrades. You should seek professional repair or look into replacement parts if you experience any of the following symptoms:
- Grinding or Rattling Noises: If a fan makes a high-pitched squealing, clicking, or grinding noise even at low manual speeds, the sleeve or ball bearings have failed. Replacement internal fans typically cost between $15 and $35 but require delicate motherboard disassembly to install.
- Zero RPM Readings: If your monitoring software shows 0 RPM for a fan even when you manually set it to 100%, the fan motor is dead or the header connection has come loose.
- Instant Thermal Spikes: If your fans are verified to be spinning at maximum manual speeds but your CPU temperatures instantly spike to 95°C+ the moment you launch a game, your factory thermal paste has likely dried up. A professional can clean and repaste your CPU and GPU with high-performance thermal compound to restore proper heat transfer.
FAQ
Can manually setting my fan speed damage my gaming laptop?
No, adjusting your fan speeds via official manufacturer software or reputable third-party utilities will not damage your hardware. Modern CPUs and GPUs have built-in fail-safes (thermal throttling and emergency shutdowns) that trigger automatically if temperatures reach dangerous levels, preventing physical damage even if you configure your manual fans too low.
Why does my software show “Manual Mode” is greyed out?
This usually happens if your laptop is running on battery power, as many manufacturers lock out high-performance manual curves to preserve battery life. Plug your laptop into its official power brick. If it is still greyed out, check your BIOS settings to ensure third-party fan control is enabled, or update your OEM control software to the latest version.
What is a safe temperature range for a gaming laptop under load?
For modern gaming laptops, a CPU temperature between 80°C and 88°C is considered perfectly normal and safe under heavy load. Your GPU runs naturally cooler; you should aim to keep it between 70°C and 82°C. Anything consistently averaging above 90°C on the GPU or 95°C on the CPU warrants a more aggressive manual fan curve or physical cleaning.
Are external laptop cooling pads actually worth using?
Yes, especially those that elevate the rear of your laptop. Lifting your laptop even one inch off your desk increases the volume of air your intake vents can draw. A high-quality, multi-fan cooling pad running off a standard USB connection provides a steady stream of cool air directly to those intakes, lowering overall chassis temperatures and allowing your internal fans to run at lower, quieter manual speeds.


