
Gaming laptops are marvels of modern engineering, packing desktop-class performance into chassis that are often less than 0.8 inches thick. However, this compact design creates a massive challenge: heat dissipation. When you push a high-end graphics card and multi-core processor to their limits, they generate significant thermal energy. Without a properly configured cooling strategy, your laptop will quickly run into trouble.
If you leave your fan curves on default settings, or worse, configure them incorrectly, several things can go wrong. First, you might experience thermal throttling, where your CPU or GPU dynamically drops its clock speed to prevent physical damage, resulting in sudden, frustrating frame rate drops during gameplay. Second, running your fans at 100% capacity constantly can prematurely wear out their fluid dynamic bearings, leading to annoying high-pitched rattles and early hardware failure. Finally, a poorly optimized fan curve can turn your gaming space into a virtual wind tunnel, producing upwards of 55 decibels of noise even when you are just browsing the web or streaming video.
As an Amazon Associate we earn from qualifying purchases at no extra cost to you.

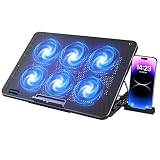
As we look at the hardware landscape of 2026, finding the sweet spot between acoustic comfort and thermal safety is essential. Customizing your fan curves allows you to dictate exactly how fast your internal fans spin at specific temperature thresholds, keeping your system cool under pressure without sounding like a jet engine during lighter tasks.
What You Need
Before adjusting your system’s internal cooling parameters, gather the necessary software tools and physical accessories. While software controls the internal fan speeds, physical cooling aids can significantly reduce the workload on your laptop’s built-in fans.
| Item | Why You Need It | Optional? |
|---|---|---|
| OEM Control Software (e.g., ASUS Armoury Crate, Lenovo Vantage, MSI Center, or Alienware Command Center) | Allows direct access to your laptop’s proprietary fan controllers and power profiles. | No |
| Third-Party Fan Control Software (e.g., Fan Control or MSI Afterburner) | Provides highly granular, node-by-node curve customization if your OEM software is too basic. | Yes (highly recommended for advanced users) |
| Hardware Monitoring Utility (e.g., HWiNFO64 or HWMonitor) | Tracks real-time CPU and GPU temperatures, fan RPMs, and power consumption (wattage) during tests. | No |
| External Laptop Cooling Pad | Reduces ambient case temperatures by 3°C to 8°C, allowing your internal fans to run at lower, quieter RPMs. Highly recommended options include the Kootek Laptop Cooling Pad ($29.99, featuring 5 quiet fans for 12"-17" laptops) or the LIANGSTAR Laptop Cooling Pad ($20.99, featuring 6 quiet fans and adjustable speeds). | Yes |
| Compressed Air Can | Clears out dust blockages from the exhaust fins before you begin calibrating your new curves. | Yes |
Step-by-Step
Adjusting fan curves requires a methodical approach. You must balance the thermal limits of your silicon (typically 90°C to 100°C for CPUs, and 80°C to 85°C for GPUs) with your personal noise tolerance.
Step 1: Clean Your Hardware and Set Up Monitoring
Estimated Time: 10 minutes
Before modifying any software settings, ensure your physical components are clean. Use a can of compressed air to blow dust out of your laptop’s intake vents and exhaust ports. Dust buildup forces fans to spin faster to achieve the same cooling effect, which will skew your research results.
Once clean, place your laptop on a flat, hard surface or mount it on an elevated cooling pad. Connect your power adapter, as laptops use different performance profiles when running on battery power. Open your hardware monitoring utility (such as HWiNFO64) and leave it running in the background to log your baseline idle temperatures. Ideally, a clean gaming laptop should idle between 35°C and 50°C.
Step 2: Establish Your Load Baseline
Estimated Time: 15 minutes
Launch a demanding game or run a system stress test (like Cinebench or 3DMark) for 10 minutes. Observe your maximum temperatures and fan speeds on your monitoring software.
Take note of when thermal throttling occurs. If your CPU reaches 95°C or higher and your frame rates begin to stutter, your default fan curve is failing to keep up with the heat output. Note down the maximum temperature reached and the corresponding fan noise level. This gives you a baseline to improve upon.
Step 3: Access Your Fan Curve Interface
Estimated Time: 5 minutes
Open your chosen management software. If you are using OEM software like ASUS Armoury Crate, navigate to the “Manual” or “Custom” performance profile tab. If you are using a universal tool like Fan Control, identify your CPU and GPU fan sensors. You will see a graph where the horizontal axis (X-axis) represents temperature in degrees Celsius, and the vertical axis (Y-axis) represents fan speed as a percentage (0% to 100%).
Step 4: Plot the Optimal Curve Nodes
Estimated Time: 20 minutes
An optimal fan curve is not a straight diagonal line; it is a progressive curve that remains quiet during light tasks and ramps up aggressively only when hardware damage is a risk. Plot your curve using these four key temperature zones as a guide:
- The Silent Zone (Up to 50°C): Set your fan speed between 0% and 25%. When browsing the web or writing documents, your laptop should remain virtually silent.
- The Transition Zone (50°C to 70°C): Set your fan speed to ramp smoothly from 25% to 50%. This handles moderate workloads, photo editing, or light indie gaming without sudden spikes in noise.
- The Gaming Zone (70°C to 85°C): This is where your laptop spends most of its gaming time. Set your fan speed to scale from 50% to 75%. This range provides excellent heat dissipation while keeping the fan noise below the threshold of distracting, especially if you wear gaming headphones.
- The Critical Safety Zone (85°C and above): If your system hits 85°C on the GPU or 90°C on the CPU, you must prioritize hardware safety over acoustics. Set the fan curve to ramp sharply up to 95% or 100% speed at these thresholds to rapidly exhaust heat and prevent thermal throttling.
Step 5: Configure Hysteresis (Fan Spin-Up Delay)
Estimated Time: 5 minutes
If your software supports it, locate the “Hysteresis” or “Response Time” setting. Hysteresis acts as a buffer or delay timer. For example, if your CPU temperature briefly spikes from 55°C to 65°C for a single second during a file download, you do not want your fans to instantly rev up and then immediately slow back down. Setting a hysteresis value of 3 to 5 seconds (or 3°C to 5°C) ensures your fans adjust smoothly, preventing annoying, rapid changes in fan pitch.
Step 6: Test, Monitor, and Adjust
Estimated Time: 20 minutes
Save your custom profile and apply it. Relaunch your gaming stress test. Keep an eye on your hardware monitor to see if your maximum temperatures are lower than your baseline results.
If your temperatures are stable (GPU below 80°C, CPU below 90°C) and the noise level is acceptable, you have found your optimal configuration. If the laptop is still too hot, raise the fan percentages in your “Gaming Zone” by 5% increments. If it is too loud and you have thermal headroom to spare, you can safely lower the fan percentages slightly.
Mistakes to Avoid
- Setting a “Flat” Curve: Avoid configuring your fans to run at a constant speed (e.g., a flat 60% across all temperatures). This wastes energy, creates unnecessary noise at idle, and fails to protect your system during intense workloads.
- Setting 100% Speed Too Early: Do not set your fans to max out at 70°C. Modern laptop silicon is designed to run safely in the high 70s and low 80s. Forcing 100% fan speed too early unnecessarily wears out the fan bearings and creates an irritating noise environment.
- Ignoring the GPU Curve: Many users only configure their CPU fan. Gaming laptops usually have independent fans for the CPU and GPU. Make sure to set custom curves for both, as the GPU generates massive amounts of heat during gaming sessions.
- Forgetting to Set the Software to Run on Startup: If you use third-party tools like Fan Control or MSI Afterburner, ensure you check the “Start with Windows” option. Otherwise, your system will revert to loud or inefficient default profiles every time you reboot.
How Often
You should inspect your fan curves and thermal performance at least twice a year. Ambient room temperatures change with the seasons; a fan curve that works perfectly in a cool, air-conditioned room during winter may cause thermal throttling during hot summer months. Additionally, you should review your settings after any major BIOS update or operating system upgrade, as these system changes can sometimes reset your custom fan controllers to factory defaults.
When to Call a Pro or Replace
Custom software curves can only do so much. If your CPU consistently surges past 95°C and your GPU exceeds 86°C even when your fans are manually set to a constant 100% speed, your internal thermal interface materials may have degraded. Standard silicone-based thermal paste dries out and loses its effectiveness over two to three years of heavy use.
If you are comfortable opening your laptop, you can clean the heatsink assembly and reapply a premium thermal compound yourself. However, if your laptop uses liquid metal thermal interface material (common in high-end gaming laptops), you should take it to a professional technician. Liquid metal is highly electrically conductive; a single misplaced drop can permanently short out your motherboard. Additionally, if you hear grinding, clicking, or rattling noises coming from your vents, the fan bearings have physically failed and the fan units must be replaced entirely.
FAQ
Is 85°C too hot for a gaming laptop GPU?
While 85°C is near the upper limit of optimal operation, it is not immediately dangerous. Most modern laptop GPUs will begin to thermal throttle at 86°C or 87°C to protect themselves. Ideally, you want your custom fan curves to keep your GPU operating between 75°C and 82°C during heavy gaming sessions.
Can custom fan curves void my laptop warranty?
No, adjusting your fan curves using official OEM software or standard third-party tools like MSI Afterburner will not void your warranty. These tools operate within the safe voltage and speed parameters hardcoded into your system’s firmware. However, physical damage caused by neglecting system overheating or poorly executing a manual repasting job can void your warranty.
Why does my laptop fan ramp up loudly when I just open a web browser?
This is usually caused by a lack of hysteresis (delay) in your fan curve settings. Opening a web browser causes a brief spike in CPU usage, which quickly raises the temperature for a fraction of a second. Setting a 3-second delay or smoothing out the transition zone in your fan curve software will prevent the fans from reacting to these brief temperature spikes.
Do laptop cooling pads actually help with custom fan curves?
Yes, they are highly effective companions to custom fan curves. Quality cooling pads, like the Kootek or LIANGSTAR models, force fresh air directly into your laptop’s intake vents. This extra airflow can drop internal temperatures by several degrees, allowing you to run your internal laptop fans at lower, much quieter speeds while maintaining the same level of performance.


