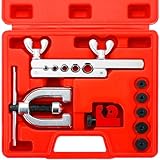
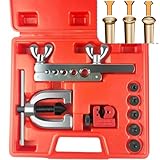
The best pipe flaring tool kits for brake and plumbing lines are hydraulic universal kits that create 45-degree double/inverted flares and 37-degree single flares for brake lines, and 45-degree single flares for soft copper plumbing, covering 3/16-inch to 1/2-inch tubing – bench-mounted hydraulic kits offer the best alignment for stainless steel brake lines, while compact lever-type handheld kits are sufficient for occasional copper and mild steel work.
As an Amazon Associate we earn from qualifying purchases at no extra cost to you.


Our Top Picks


Top 3 picks at a glance
Flare Standards Matter More Than Brand Name
Buying by tubing size alone leads to leaks. The flare angle and form must match the fitting standard your vehicle or plumbing system uses. A 45-degree flare will not seal in a 37-degree AN fitting, even if the tube diameter is correct.
| Flare Standard | Angle | Form | Common Tubing Sizes | Primary Application |
|---|---|---|---|---|
| SAE Double / Inverted Flare | 45 degrees | Double-folded | 3/16″, 1/4″, 5/16″, 3/8″ | Domestic and Asian vehicle brake lines, factory fuel lines |
| SAE Single Flare | 45 degrees | Single | 1/4″, 5/16″, 3/8″, 1/2″, 5/8″ | Soft copper plumbing, water lines, low-pressure fuel |
| Bubble / ISO / DIN Flare | 90-degree bubble | Single bubble | 3/16″ (4.75mm), 1/4″ (6mm), 8mm, 10mm | European vehicle brake lines (BMW, VW, Mercedes), some newer US models |
| AN / JIC Single Flare | 37 degrees | Single | 3/16″, 1/4″, 5/16″, 3/8″, 1/2″ | Performance brake lines, transmission cooler lines, aftermarket fuel systems |
| GM Push-Connect | N/A | Bead formed | 3/8″, 1/2″ | GM fuel and transmission lines (requires forming dies, not a flare) |
If you only work on US-market brake lines from the 1980s to present, a kit that does SAE double flares in 3/16″, 1/4″, 5/16″ and 3/8″ covers about 95% of jobs. If you work on European cars or mix brake and plumbing work, you need a kit that includes both bubble and 45-degree single flare dies. The most versatile kits, such as the hydraulic universal class represented by the Mastercool 71475 platform, include dies for all four flare types in one case.
Decision Matrix: Match Your Work to the Kit Type
Use this matrix to avoid overbuying or buying a kit that cannot handle your tubing material.
| Your Situation | Recommended Kit Class | Why | General Market Range |
|---|---|---|---|
| DIY, 1-2 brake line replacements per year, mild steel or copper-nickel only | Lever-type bar and yoke kit (T-handle screw press) | Low cost, does SAE double flares accurately in soft materials if you deburr carefully | usually $35–$90 |
| DIY / light professional, European + domestic cars, includes plumbing copper | Turret-style lever kit with bubble dies | One tool does double and bubble without swapping adapter dies, better concentricity than bar-type | usually $90–$180 |
| Frequent brake work, stainless steel lines, or mobile repair | Handheld hydraulic flaring kit | Hydraulic ram forms stainless with far less effort and runout; no vise needed | usually $180–$350 |
| Shop use, high volume, stainless, coated lines, and fuel line beads | Bench-mounted hydraulic kit with full die set | Maximum alignment accuracy and durability; handles 1/2″ stainless and GM bead forms | usually $300–$550 |
How to Read the Matrix
The jump from lever to hydraulic is not about speed, it is about material. Stainless steel brake line (commonly 304 stainless, 0.028″ wall) requires roughly 2.5 to 3 times the forming force of mild steel or copper-nickel (NiCopp) of the same size. A T-handle screw can generate that force, but operator technique becomes critical and die wear accelerates. If stainless is on your plan, budget for hydraulic.
Tubing Size and Material Compatibility
Most kits advertise a size range, but the usable range depends on material:
- 3/16-inch (4.75mm): The standard for almost all passenger vehicle brake lines. Every brake-capable kit must do this size well. Check that bubble dies include true 4.75mm, not just 3/16″ imperial, as the 0.005″ difference affects ISO bubble sealing.
- 1/4-inch, 5/16-inch, 3/8-inch: Used for larger brakes on trucks, fuel lines, and transmission cooler lines. Also the common range for 37-degree AN flares. If you do AN lines, confirm the kit lists 37-degree dies explicitly.
- 1/2-inch and 5/8-inch: Relevant only for plumbing and HVAC soft copper. Most automotive-focused hydraulic kits stop at 1/2″. Full plumbing capability requires a separate 45-degree single-flare plumbing kit or an HVAC eccentric flaring tool.
- Material hardness: Copper-nickel (NiCopp/Cunifer) and soft copper form with minimal force and forgive slight misalignment. Coated mild steel (OE style) is next. Stainless steel is the hardest brake material and exposes any play in the die or yoke. Plain mild steel for plumbing is rarely flared in hard form – it is usually soft copper.
A practical rule: if a kit lists stainless steel in its spec sheet for 3/16″ and 1/4″ double flares, it will handle all softer materials in those sizes. If it only lists copper and aluminum, assume it will struggle or crack stainless, even if the size fits.
Bench vs. Handheld Designs: Alignment Accuracy
Leaks are almost always caused by eccentricity, not by angle error. Eccentricity is when the flare is not perfectly concentric with the tube centerline, creating a thin side that cannot seat.
- Bar and yoke (handheld, screw press): The tube is clamped in a split bar, and a yoke with a cone screw is tightened over it. Accuracy depends entirely on how squarely you clamp the tube and how evenly you advance the cone. Experienced users get excellent results in copper-nickel, but clamped length and deburring are unforgiving. Usually requires a vise to hold the bar.
- Turret / tower handheld: The die rotates into place over a single clamped tube. The forming cone is captive, so it cannot drift off-center. Typically 0.003″ to 0.005″ runout versus 0.008″ to 0.015″ for a worn bar-type. No vise needed for small sizes, but still manual leverage.
- Handheld hydraulic: Uses a hydraulic cylinder and interchangeable diesets. The tube is clamped horizontally and the ram drives the forming punch straight in. Runout is typically under 0.003″ even in stainless, and effort is low. Usable under a vehicle or on a workbench.
- Bench-mounted hydraulic: Bolted to a bench or held in a vise, with a long handle pump. Provides the most stable clamping force – often over 8,000 lbs at the die – which prevents tube slip that causes off-center flares in hard materials. Best for 3/8″ and larger stainless.
For brake work, concentricity specification to look for: dies ground to +/- 0.001″ and a hardened clamping system that does not mar the tube. If dies are cast rather than machined tool steel, they will deform under stainless load after 20 to 30 flares.
Kit Durability: What Actually Fails
Spec sheets list die count, but not die life or serviceability.
- Dies: Look for S2, 4140, or 6150 tool steel, heat-treated and black-oxide or polished. Untreated mild steel dies mushroom at the clamp edge when used on stainless. Replaceable dies signal a professional-grade kit; press-fit yokes do not allow replacement.
- Yoke and screw threads: On screw-press kits, the lead screw and T-handle threads wear first. ACME threads last longer than V-threads under flaring loads. On hydraulic kits, seals and pump pistons are the wear point – kits that offer rebuild seal kits extend life significantly.
- Clamping mechanism: Split bars that use wingnuts to clamp will slip on coated or oiled line. Cam-lock or eccentric lever clamps maintain far higher clamp force with less effort and do not require re-tightening mid-flare.
- Case and organization: This matters more than it seems. Lost adapter dies render a 7-die kit useless. Cases with die-specific molded spots reduce loss compared to loose pouches.
For most users, a hydraulic universal kit with a full die set costs more upfront but replaces the need for three separate kits (SAE double, bubble, and AN). In that context, the higher price usually pays back after two to three stainless jobs where a cheaper kit would have produced a scrapped flare and wasted line.
Concrete Setup for a Leak-Free Double Flare
Whether bench or handheld, the process for a 45-degree SAE double flare is the same. The most common error is incorrect tube stick-out.
- Step 1 – Cut square and deburr: Use a tubing cutter, not a hacksaw. Ream the inner diameter until no burr remains and chamfer the outer edge lightly. A burr folded into the first step of a double flare creates a split that will leak under pressure. Clean with brake cleaner.
- Step 2 – Set stick-out: Insert tube through the die to the correct height. For most double-flare dies, stick-out equals the thickness of the die shoulder – often about 1/16″ (1.5mm) above the die face for 3/16″ tube. If the kit includes a height gauge, use it. Too much stick-out creates an oversized flare that bottoms in the fitting; too little creates a thin flare that cracks.
- Step 3 – Clamp fully: Tighten the clamp until the tube cannot be rotated by hand. On hydraulic kits, pump until the clamp locks. Any slip during forming guarantees eccentricity.
- Step 4 – Form in two stages: First, drive the adapter (button) die to fold the tube inward and form the inverted bubble. Second, remove the adapter and drive the 45-degree cone to finish the flare to 45 degrees. Never skip the adapter for a double flare – a single-hit 45-degree cone is only a single flare.
- Step 5 – Inspect: A good double flare shows a smooth, double-thick lip with no cracks at the fold, uniform width around the circumference, and no tool marks on the sealing face. Measure outer diameter – a 3/16″ double flare should be approximately 0.290″ to 0.310″ across.
For 37-degree AN flares and bubble flares, the process is single-stage – no adapter is used. Lubricate the cone with a drop of brake fluid or forming lube for stainless, never anti-seize or heavy grease which can contaminate the brake system.
What to Buy Based on Your Primary Work
If your work is 90% domestic car brake lines in copper-nickel or mild steel, a turret-style kit and a separate inexpensive eccentric flaring tool for plumbing copper covers everything for well under $200. If you regularly touch European cars or need to form stainless steel, prioritize a handheld hydraulic universal kit that explicitly lists bubble, double, and 37-degree dies for 3/16″ to 3/8″. If you run a shop doing custom stainless lines and fuel system fabrication, a bench-mounted hydraulic platform with GM bead dies eliminates the need for multiple specialty tools.
Avoid kits that claim universal coverage but only include 45-degree dies – without a bubble die set they cannot correctly service ISO-bubble brake systems, and without a 37-degree die they cannot make AN flares. Coverage on paper does not equal correct geometry.
FAQ
Can I use a plumbing flaring tool for brake lines?
No, not reliably. Most plumbing tools create only a 45-degree single flare for soft copper. Brake lines require a double flare or bubble flare to withstand 1,500 to 2,000 psi system pressure. A single flare on steel brake line will split or leak.
Do copper-nickel brake lines need a different flare than steel?
No. Copper-nickel uses the same SAE double or ISO bubble standard as the steel line it replaces. The alloy only changes how easily the flare forms – copper-nickel forms with about 40% less force and is more forgiving of minor technique errors.
Why does my double flare keep cracking?
Three common causes: failure to deburr the inside diameter, excessive stick-out causing over-stretching, or trying to double-flare work-hardened stainless with a screw-press kit that cannot deliver enough controlled force. Annealing is not recommended for brake line – switch to hydraulic forming and verify deburring instead.